


Cool Light Effect (Adobe Photoshop CS2+
Ok this is one of my tuts I created quite a while ago, so let me know how you like it.
In this tutorial, you will be learning how to create cool light streaks to edit onto your image, and this will probably teach you a few new effects in Adobe Photoshop CS3. Also, to complete this tutorial you will need to have a little bit expierence with using the pen tool.
Step 1: Firstly, find the image you are going to use. Try to find just a simple one color object, this would work best. Make the background black. Here is what I will be using.

Step 2: Next, you need to create a new layer above the background layer, but below your object layer. Create a radial gradient, you may use any color you like, but make sure at least one of your colors are black, and the other color can be whatever it wants. I used a blue. You should have something similar to this.

Step 3: This next step can be kind of tricky, so take your time. Find some kind of texture that you like, or it could even be a brush. If your texture has any color to it, you can desaturate it to get rid of the color. You also might want to try lowering the opacity, to make it look better. Just play around a little bit with this step, and see what you can come up with, try to get something like this.

Step 4: Next, you want to add an outer glow to the object layer. Right click, and go to blending options. Then select the "Outer Glow" tab. In the outer glow tab, make sure the blending mode is set to Color Dodge. Set the opacity anywhere from 70% to 90%. Keep the spread at 0, and put the size at about 40%. These settings may be changed to how you like, but the key here is to keep the mode on Color Dodge to get an intense glow effect off of the object.
Step 5: Next, we need to prepare a brush for the streaks. Get a soft brush, about 13px. Go into the brush settings, and we need to change a few things around in here. First, go to the "Shape Dynamics" tab. Make the size Jitter 0%. Set the control on fade, and in the little box to the right of fade type in 90. Make the minium diameter 40%. Angle Jitter 0%. Roundness Jitter 0%. Minium roundness 79%. That should be good for the brush settings.
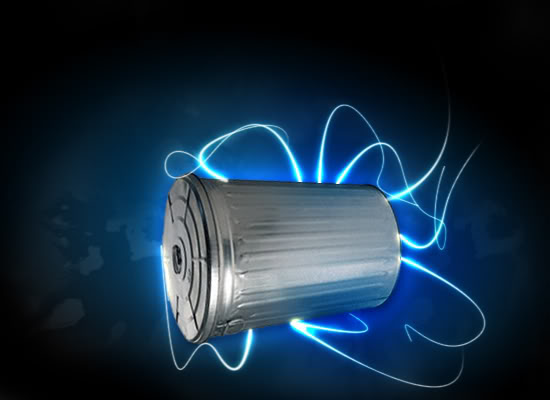
Now, this is where you need to know how to use the pen tool. Grab the ben tool, and make as many streaks as you'd like (See my example for what kind of streaks). I did about 11 or 12 different streaks, but you can do more or less, which ever looks best on your image. On the streaks layer, go to the blending options, and select outer glow. Put the mode on color dodge, and then opacity on 90% or higher, mine is on 100%, but you may do whatever you like. The only other setting I changed was the Spread I put to zero, and the size I moved to seven.
You should now have something similar to this.

Step 6: This step is optional. I went back to my gradient layer, and made it a little larger to add more to the lighting effect. With more gradient around the object, it allows for more lighting effect as well. Only do this if you think you need more lighting around your object. This is not always necessary.
Step 7: Here is where we start getting to add a little more detail to our image. Grab a 200px soft brush. Select the color that you have been using, mine would be blue. Click a few times where you think a little extra light would be good. Keep in mind that this is also going to help blend in our object a little better with the background.
Click about three times with the 200px soft brush, put the layer mode on Overlay, and if you want you can reduce the opacity. You can do it one more time if you want, but only click about twice, and set the layer mode on soft light this time.
Step 8: Now it's finially starting to come together, but it's still missing something. A good idea here would be to add some glowing orbs. Again, set up another brush, this time also messing with the scatter options to get a more random look for the orbs instead of doing it click by click.
Here, I took a 9px soft brush. Go into your Shape dynamics tab, put size jitter on 100%. Then go into your scattering tab, check the "Both Axes" box, and set the scattering to 1000%. After you click around a couple of times, use a larger brush, and do a couple of bigger orbs as well. You can do a couple different orbs if you want. Apply the same glow effect as we did for the streaks, and don't forget to put the outer glow effect on color dodge. You may grab your eraser, and lower the opacity of the eraser to about 45%, and click a couple times on a few of the different orbs to give it a different effect on each orb.

Step 9: You can add a couple focal orbs if you'd like. Just use the Eliptical Marquee tool to draw a couple of circles. Fill them in with white, and put it on about 2% obacity. Use various sizes, and put them in random spots, don't get too carried away with this though. This just adds a little more realism to the image. Now all you have to do is add some text and you are done. Usually on text you wouldn't use an outer glow, but for this image it can look really well. Use the color dodge mode on the outer glow, and up the size to about 7%. I also added a pattern, and lowered the opacity.
Here is the final image.

This tutorial was created 100% by GhostRider103. This is an intermediate tutorial, some of the things in here were not fully explained, and some use of the pen tool is needed to complete this tutorial.
____________________________________
This tutorial i written by ghostrider103 ~ www.prenders.net